
Wednesday, January 9, 2013

Thursday, December 13, 2012
Make Your Wedding
Exciting news!!! The weddings craft book I worked on all summer is out!!!
You can find out all about it HERE.
Thursday, October 4, 2012
Under Construction

I am working on building another lemmemakeit website hence the MIA on my blogspot account. Sorry for the abandonment. I think about you all the time. Hopefully the new site will be up sooner than later :)
Wednesday, September 5, 2012
inkodye a stain

Nicki stopped by with a stained shirt and an hour before she had to go to work to stain another shirt at the restaurant. She hates pink and doesn't know why she bought the shirt in the first place but came to the conclusion that she should just dye it and solve the stain and pink problem in one shot.
I suggested we experiment.

I pulled out Inkodye and printed out the Nirvana smiley face. Inkodye is a light sense dye that's definitely a lot more fun (and experimental) than just straight up RIT dyeing. Because Inkodye can be used with a "resist", we thought it could be an interesting way to create a one-off band shirt... fast.

I taped the Nirvana face to a piece of black card stock and cut it out with a craft knife. After placing a board in the inside of the shirt and taping it in place, I rolled the inkodye on the shirt with a foam roller, not being too concerned with it being perfect—like I said, we were doing this fast.

Once a thin layer of the dye was applied in a square on the front of the tee, I placed the cut-out face over it.

We carried it outside and placed a piece of glass over the cut-out to keep it flat on the shirt. We sat there for about 15 minutes in the sun and...

...slowly the area where I painted the ink started to turn blue!!

We ran the shirt inside, removed the paper and after rinsing the dye out of the shirt, we hung it to dry. Nicki's new experimental band shirt was the result!

Much more interesting than an oil stained pink shirt.
Wednesday, August 22, 2012
Monday, July 2, 2012
Make 4th of July Fireworks

Some sparkle and pop for the fourth is great if you are having guest over to celebrate. With just a box of plastic drinking straws and some glitter, I created this fun little firework centerpiece.

To make it, gather 8-12 straws together, tie tightly in the center with a piece of waxed twine and bend to fray the straws out into a circular star form. Paint the straws with white glue and sprinkle on different glitters. I used this fabulous Martha Stewart Crafts holographic glitter that comes in the shapes of stars, hexagons and diamonds. The variety of chunky glitter flakes makes the fireworks more dynamic than just glittering them all with your standard fine glitter. Make 5 or 6 fireworks and display on skewers in a vessel filled with colored sand, or even silver dragees.

And you can use the same straw tying technique to make snow glittered snowflakes for the wintertime!
Happy Birthday America!!!
Monday, June 11, 2012
craft room hoarder
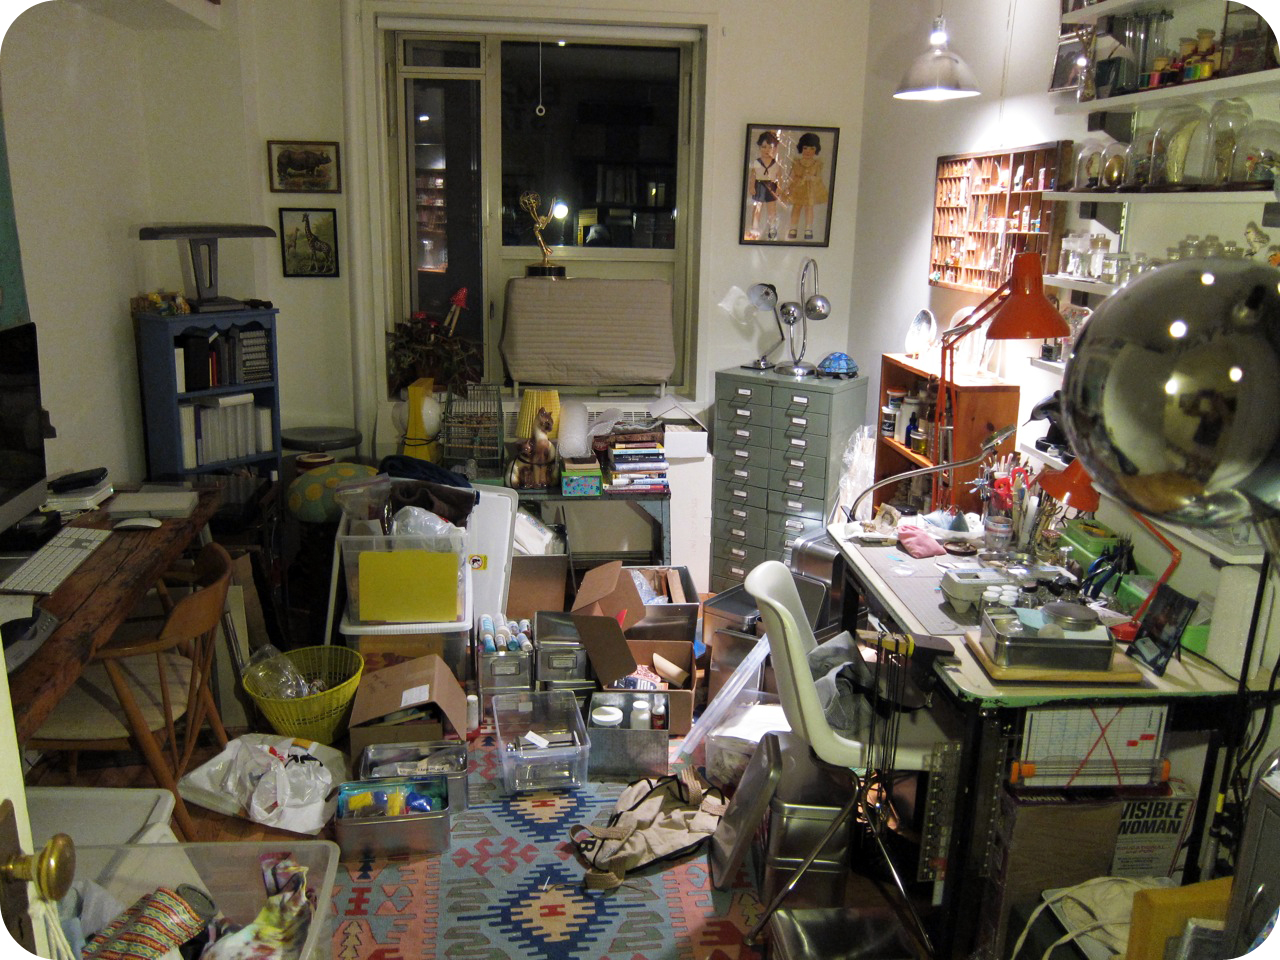
I'm embarrassed to say that this was my home craft room last week. I have not been able to craft, as you probably assumed, because there was absolutely no working space and things needed to be organized... badly.

This weekend was spent doing just that, organizing and clearing house.
It was a big job and with such nice weather, a total shame to be inside. But it needed to be done.

Ashley and I built shelves for utility purposes, with standards and pine wood.

While my bedroom still holds all the craft room overflow, it is starting to come together... well, half the room at least.
Thursday, May 31, 2012
my start up disc is full

In the process of backing up my computer. Be back to blog when I have enough room to edit pictures!!
Monday, May 28, 2012
a few days in London

I traveled to London last week to do QVC for Martha Stewart Crafts. With the Olympics firing up and the Queens Diamond Jubilee in full swing, the city was in full patriotic mode.

Not to mention, the Chelsea Flower Show was completely in bloom, so festivities were happening all around.

The Queen's garden party brought out the best dressed, with ladies wearing all sorts of hats and fascinators.

We are able to make it to Liberty of London so I could pick up a pair of Liberty patterned Dr. Martens—yay!

London Bridges were not falling down... thank God.

I admire the architecture in London, being so different than that of New York's. I also fancied the odd leafless trees!

It's not a lie when people say that London's Underground is so much better then New York's subway—it really is.
More to come from my visit to the Victoria and Albert Museum and a few crafts from QVC!
Monday, May 21, 2012
Martha's Crafter's Clay

Martha Stewart Crafts recently debuted this great product called Crafter's Clay. These beautiful flowers were crafted by the clay founder's daughter, Yukiko Miyai. She has had a lifetime of experience working with the clay—hence the incredible life-like flowers—but what's great about what Martha's done, is she's setup kits with silicone molds to make working with the clay super easy. You can read more about it HERE.

By just using molds, Yukiko showed Martha how she created this wreath. How easily the colors mix and the texture of the clay are probably my two favorite features of the clay. Oh, did I mention that this wreath probably weights less than a couple quarters?!? Because the clay is mainly paper based, it is extremely light weight! Also non-toxic and air dries!

Watch how natural Yukiko is with the clay:
Sunday, May 13, 2012
martha

The Martha Stewart Show has wrapped, for good, after seven seasons. This doesn't mean Martha won't be on TV anymore, in fact she is currently in the midst of filming another show that will be on my favorite channel, PBS. Unfortunately there won't be any crafting in this cooking show :(
I recently recalled all the segments I've done with Martha through the years and didn't realize how many there actually were! I'm really going to miss crafting every single day.
t-shirt bag, glow-in-the-dark funkins, toadstools, recycled notebooks, reusable tile calendar, hoodie costumes, acorn lamp, beaded heart pendant & jewelry gift pouch, marbleizing techniques, parrot headpiece, homemade lip stain, egg boxes, ribcage t-shirt & exposed bone jeans, photo gift tags, recycled leather handbag, mesh ombre necklace, surprise easter eggs, whimsical window eggs, banner birthday card, gnome costume, accordion photo wedding favors, rope bangles, clay mushrooms, felt animal art, leather fringed wool wrap, sailor valentine boxes, felt carrot pouch, birdcage.
Tuesday, May 1, 2012
Flag

We ventured upstate on Saturday to do our annual rummage and estate sale treasure hunting. I was really excited to have scored this vintage, possibly antique, American Flag. Being a huge fan of Antiques Road Show, I know that certain Americana things can possibly be worth a lot of money. The $5 price tag made the sale a no brainer, but after I was unbelievably curious to learn more about the flag. I could tell it was not new by the brittle wool fabric, the wear and tear and discoloring it had. Upon further research, I learned a whole lot about the history of American Flags. This particular flag is called a Yacht Ensign. It has a circle of 13 stars with an anchor in the middle, 7 white and 7 red stripes.

To determine the value of a flag there are the factors of design, age, scarcity, size, condition, quality, etc. Now I am in the process of tracking the history of this particular flag made by the Valley Forge Flag Co. I know they started the company in 1882 and began sewing flags in Spring City during the Depression era. I've emailed the company with questions about when they started making this style flag and when they stopped producing this flag with wool fabric. I love the investigation of this and learning about something I might never have been interested in. And maybe I even found a gem!—but probably not : (
While we're on the topic of flags, I actually have made one before! Not American, but Chilean for a story about wine for Men's Journal.

It was quite rewarding and fairly quick and easy to make. I pieced the different color fabrics together in the proper flag size, created a star and stitched it on, ironing in between steps. The finished flag was so crisp but i needed it to look old so I tea stained and wrinkled it up for the purpose of the photo shoot.

Wednesday, April 25, 2012

Friday, April 20, 2012
Hole
No Friday the 13th has ever been unique for me other the one that just passed. After a special viewing of Patty Schemel's Hit So Hard, a small crowd gathered at Public Assembly in Williamsburg, where Hole, minus C Love, promised to play. That youthful awkward excitement peaked when Courtney Love herself, rolled in to join the band at nearly 2 am. Happy to have been a part of the whole Hole experience : )
video: hole covering wipers song 4.13.12
Thursday, April 19, 2012

Wednesday, April 18, 2012
X X X

I recently had the privilege to work on an auction project where 100% of the proceeds from sales go to Pacer’s National Bullying Prevention Center. The task was to embellish, decorate or re-design a plain American Apparel white dress. An acne treatment product called X Out sponsored the auction. For those of you familiar with the miracle product, Proactiv, from the same maker comes X Out, a new one-step pimple treatment. All I have to say, is I wish X Out was available when I was a teenager!!


Here's what I did to my white dress:
1. Bunched dress up and soaked black it with RIT Dye. It turned out more of a purple color.
2. Turned the dress inside out and pinned a piece of black cotton fabric to the chest area.
3. On a sewing machine, sewed an X shape through the dress and black fabric.
4. Trimmed all the black fabric outside the X.
5. Flipped dress right side out and trimmed the dress fabric inside the X.
5. Used fingers to fray the cut edges inside the X.
6. Lined up and pinned tons safety pins, of various sizes, through the black fabric in the X.
7. For the back of dress, folded back panel of dress vertically in half and marked a V with chalk.
8. Used a rotary cutter to cut one inch horizontal lines through both layers of fabric in V shape.
9. Opened up dress and stretched out each one inch strip to make the fabric curl.
10. Done. Wear it. Rock it.

The auction for the X Out dresses will go live on Ebay April 23. I hope you bid on mine so we can raise lots of money to stop young a-holes from abusing nice people—there is no need for bullying.

Tuesday, April 17, 2012
lemmemakeit stitched

Embroidery I did last summer while traveling. Never posted it because I didn't like the contrast between the white "e" and black "m". Maybe one day I will redo the em in grey.
Thursday, April 12, 2012
organizing, labeling and purging

Remember plastic label makers, way before p-touch?! Well they're one of my favorite manual gadgets and although it comes out rarely, I wouldn't organize without it.

For all my metal drawers and boxes, that hold a variety of craft supplies and tools, I punched out a plastic label and mounted each on a sheet of magnet, cut them out and slapped them on the appropriate storage container. This way I can move things around, if need be, without any issues or new labels.


Organizing is never fun, but it feels good to purge, know what has been accumulated and know exactly where everything you need is.
Tuesday, April 10, 2012
rockin' baby

Posted about these rock 'n roll onesies I made for my friends on its way baby on the craftsdept blog, couldn't help but share here too!


To make:
1. Pick a band. Print the logo out backwards. 2. Pick a fabric. For dimension in a design, layer fabrics—I used a thin cotton quilting fabric with wool felt on top for a few designs. For fine detailed designs, I recommend not using felt (Nirvana shirt). 3. Iron Steam-a-Seam (a double-faced fusible webbing) to a piece of fabric. Peel the protective paper off one side, place it web-side down to the backside of your fabric and iron it in place. 4. Print out design backwards and tape to web side of fabric. Use sharp scissor and a craft knife to cut out design. 5. Peel the protective backing off of cut out design and place on shirt. I referenced the original design for positioning. 6. Place a press cloth over the design and iron. Move iron in a circular motion, so not to burn the fabric. 7. Remove press cloth and let cool. 8. When soiled, hand wash and hang dry.


Subscribe to:
Comments (Atom)